EpiRAD ddRAD Mo'orea Pocillopora Library Prep and Protocol
Mo’orea Connect Pocillopora (4 sites) EpiRAD ddRAD Library Prep Notebook and General Protocol
Goals:
- Create and optimize an EpiRAD/ddRAD protocol for our lab
- Test some samples from 4 out of 8 sites in Mo’orea with one species, Pocillopora verruosa, to see if there are patterns and if it is wise to move forward with prepping and sequencing all sites for both coral species, and potentially urchins and algae also taken from those sites
Protocol written by Maggie Schedl, Jon Puritz, and Hollie Putnam
Protocols used for reference and guidence: Notebook from Jay Diamond, Bead-in Protocol from C. Hollenbeck, J. Puritz, S. Willis, T. Krabbenhoft, D. Portnoy and J. Gold, the original RAD protocol from Peterson et. al, and the quaddRAD paper.
This post contains information from this specific library prep, if you are looking for the blank version of this protocol, find it here, however it might be most informative to see a full example before going through with your own samples.
Outline
- DNA extraction and quantification
- Digestion test, simulation and sequencing planning
- Multiplexing planning
- DNA prep and dilution
- Digestion
- Clean up and quant of digested samples
- Adapter ligation
- Pooling and two clean ups
- BluePippin size selection
- Index addition and amplification
- Final libraries quant and visualization
- Notes and glossary
- Materials
DNA extraction
DNA was extracted from samples using the Zymo Research Quick DNA Miniprep Plus kit and eluted in 100ul of 10mM Tris-HCl, these posts contain all extractions and tests: 1, 2, 3, 4, 5, 6, 7, 8, 9, 10, 11
Tissue homogenization and digestion
- Beads were poured into sample tubes (samples were coral pieces stored in ~500µl DNA/RNA shield in the -20 freezer)
- Samples were homogenized by vortexing for ~30 seconds for all samples
- Most of the liquid from the tubes was removed by pipetting. This was about 300µl. The tubes contained a small amount of liquid and un-homogenized tissue left, so 200µl of DNA/RNA shield was added to each tube and those were put back into the -20
- Following recommendations for samples in DNA/RNA Shield from the kit protocol, 150µl of Solid Tissue Buffer and 10µl of Proteinase K were added to each sample
- Samples were votexed, spun down, and incubated at 55 degrees C for 5 hours shaking at 600rpm in a thermomixer
DNA extraction
- Centrifuged all tubes at 12,000 rcf for 1 minute to pellet any debris and beads
- Removed supernatant into new 1.5mL tubes
- Added 1 volume (420µl) Genomic Binding Buffer to each tube, vortexed and spun down
- 700µl of sample was added to the kit spin column and centrifuged at 12,000 rcf for 1 minute
- Collection tubes were discarded
- The rest of the digested volume was run through the column in the same way
- Added 400µl DNA Pre-Wash Buffer to each column, centrifuged at 12,000 rcf for 1 minute, and discarded the flow through
- Added 700µl G-DNA Wash Bufferto each column, centrifuged at 12,000 rcf for 1 minute, and discarded the flow through
- Added 200µl G-DNA Wash Bufferto each column, centrifuged at 12,000 rcf for 1 minute, and discarded the collection tube
- Columns were transferred to 1.5mL tubes
- Added 50µl warmed 70 degrees C 10mM Tris-HCl directly to the column filter and incubated at room temp for 5 minutes
- Centrifuged for 1 minute at 12,000 rcf
- Repeated steps 11 and 12 one more time
- Stored tubes in fridge to qubit the next day if not quantifying immediately
Quantification can be done with the qubit protocol or with the plate reader and the AccueBlue assay
To visualize DNA quality run a 1.5% agarose gel with a 1kb ladder, or run the genomic DNA TapeStation
Digestion test, simulation and sequencing planing
Digestion Simulation
See this post for a full account of simulating digestion done for this project.
I downloaded ddRADSeqTools from Github by clicking Clone or Download, and select Download Zip
Then I unzipped it and made the scrips executable by using the commands they have in the manual
unzip ddRADseqTools-master.zip
cd ddRADseqTools-master/Package
chmod u+x *.py
conda install NumPy #also the manual says you need this program installed
We used the Pocillopora damicornis genome for running the simulations. It’s not the same species but a closely related one so hopefully the information is transferrable.
The program uses a text file with all the restriction enzymes and their cut sites as a reference, I went through the file and saw that they didn’t have MspI so I added it in
nano restrictionsites.txt

MspI;C*CGG # add this in alphabetical order
Then the rsitesearch.py script uses the rsitesearch-config.txt to get all the information on what genome and enzymes to use. This is the only script I used, because it “extracts the fragments resulting from an in silico digestion of a reference genome with two particular restriction endonucleases.”
I edited the config file for Pocillopora first using a minimum fragment size bound of 150bp and a maximum bound of fragment sizes to be 700bp. Basically any other size are not going to be things you want to sequence.
nano  rsitesearch-config.txt

genfile=./poc_GCF_003704095.1_ASM370409v1_genomic.fna.gz             # add in the pocillopora genome, the . because I linked it to this directory
fragsfile=./results/fragments.fasta         # path of the fragments file
rsfile=./restrictionsites.txt               # path of the restriction sites file
enzyme1=PstI                              # id of 1st restriction enzyme used in rsfile or its restriction site sequence
enzyme2=MspI                                # id of 2nd restriction enzyme used in rsfile or its restriction site sequence
minfragsize=150                             # lower boundary of loci fragment's size
maxfragsize=700                             # upper boundary of loci fragment's size
fragstfile=./results/fragments-stats.txt    # path of the output statistics file
fragstinterval=25                           # interval length of fragment size
plot=NO                                    # statistical graphs: YES or NO
verbose=YES                                 # additional job status info during the run: YES or NO
trace=NO                                    # additional info useful to the developer team: YES or NO
You need to make a directory first called results it will right into. Then I saved and ran the script. Then I moved the results to a different name.
mkdir results
python rsitesearch.py
mv results results-poc
Output: 22679 fragments written
This means that there are 22679 fragments digested by both PstI and MspI in this Pocillopora genome that are between 150 and 700bp long.
Ideally 20,000-30,000 fragments is what you want to see in a range… but a size selection range from 150-700 is really wide and that is not something you want to sequence. Smaller fragments will amplify more and get sequenced more, so you are basically biasing your library by making a range so large. So I ran this simulation 20+ more times with a bunch of different combinations of upper and lower bounds in that range to try to optimize and build data for what our options were. Ex. 150-500bps
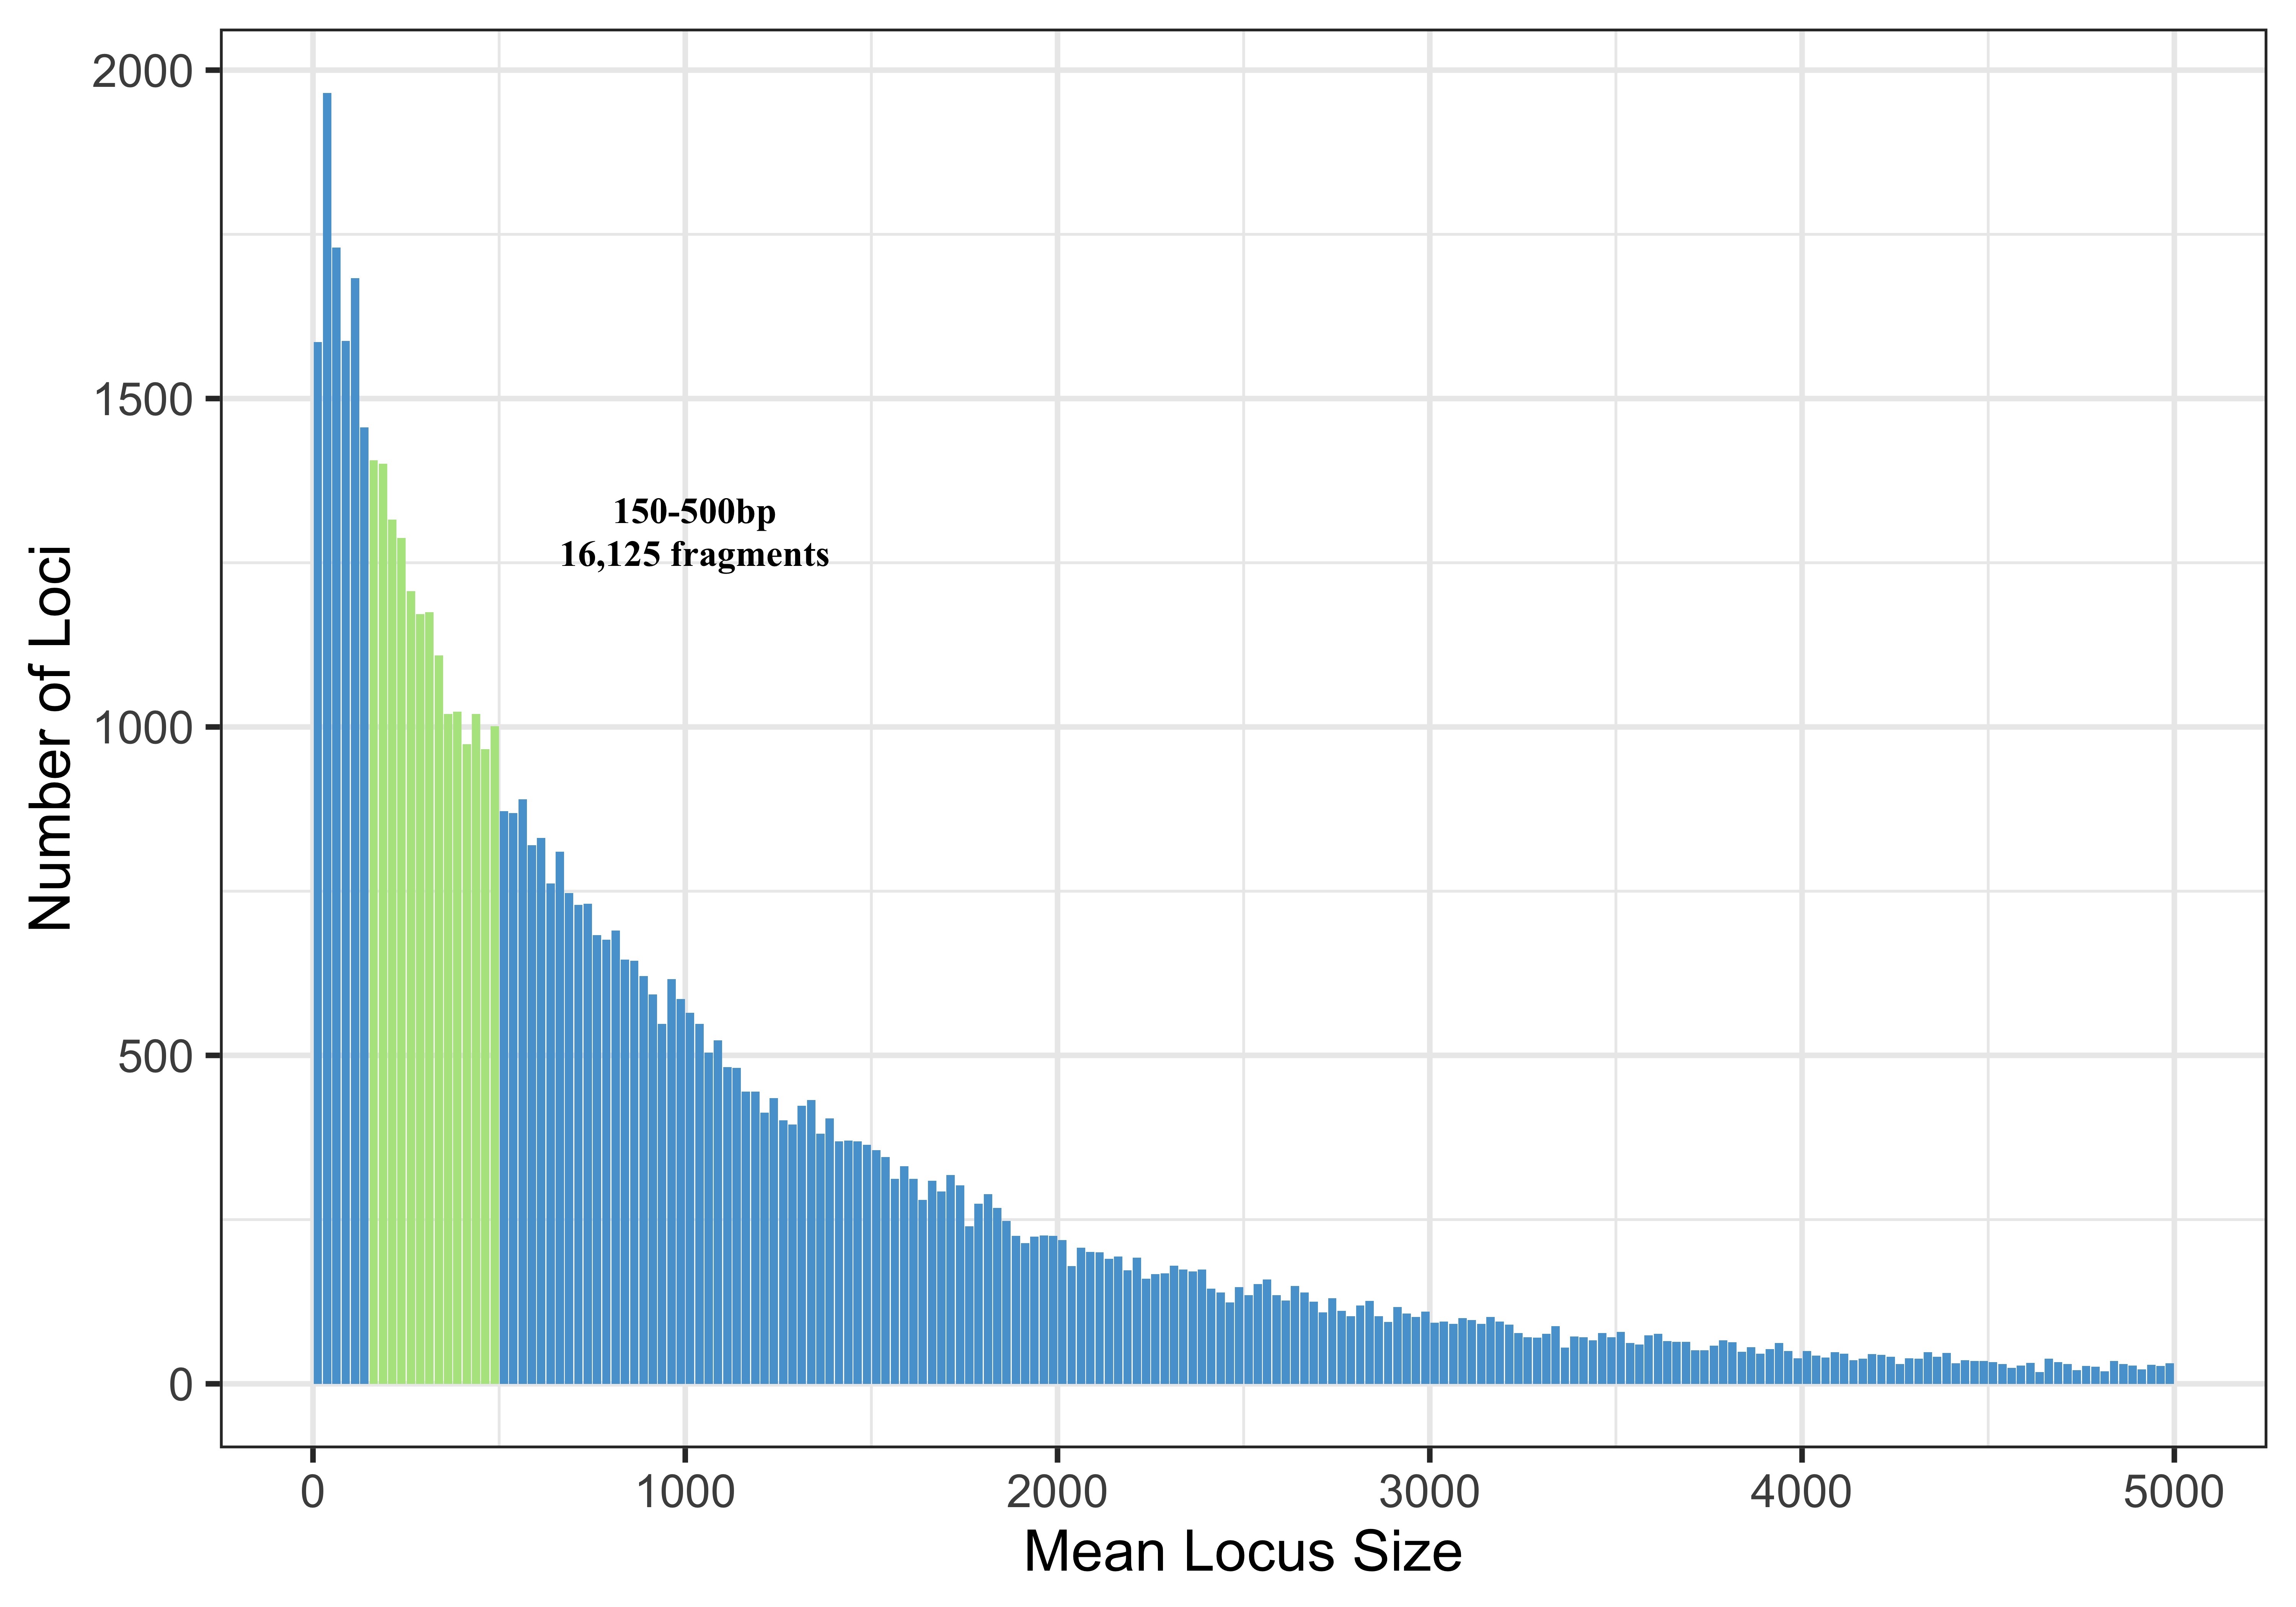
Because Pocillopora damicornis is not the same species as who we are actually working with I also did real digestions to help determine what size selection window we should use.
Digestion tests
- Digestion tests consisted of two digestions with each individual enzyme, and two digestions with both enzymes. Two samples were used to make sure results were consistent
- Samples that were extras or had a lot of DNA were used for the tests
- Samples were bead cleaned (see copious examples of how to do that below) and resuspended in 68μl
- For single digestion with PstI:
- 10μl Cutsmart buffer
- 1μl nuclease-free water
- 1μl PstI enzyme
- For single digestion with MspI:
- 10μl Custmart buffer
- 1μl nuclease-free water
- 1μl MspI enzyme
- For double digestions with PstI and MspI
- 10μl Custmart buffer
- 1μl PstI enzyme
- 1μl MspI enzyme
- All samples were digested for 12 hours (37 degrees C for 12 hours then a 4 degree hold)
- All samples were run on a genomic DNA tapestation run
- Used the TapeStation Analysis software to get the values for the locus count estimate spreadsheet green boxes

- Created a region in one of the double digested samples for PstI and MspI that spans a hypothetical size selection range, ex. 350-500 base pairs. Used this region that to get the % of total value as well as the mean size in the selected region
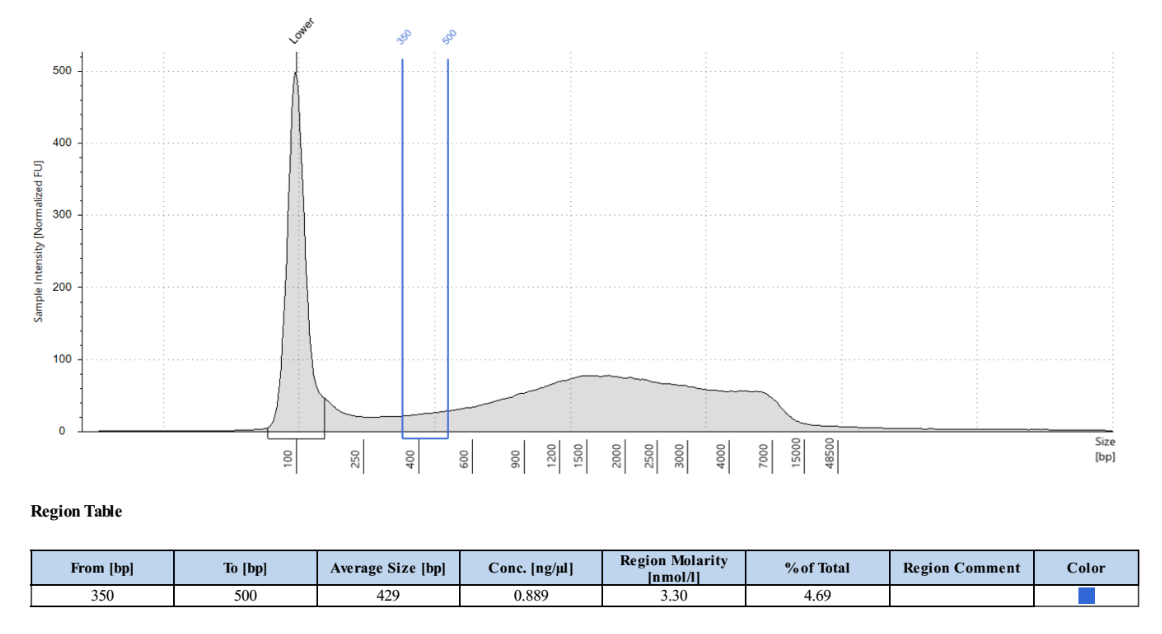
- Created a region in one of the single digested samples for PstI that encompasses the entire size range and get the mean fragment size from that region
- Created a region in one of the single digested samples for MspI that encompasses the entire size range and get the mean fragment size from that region for enzyme 2
- Used an estimate of the genome size
- Created a region in one of the double digested samples for PstI and MspI that spans a hypothetical size selection range, ex. 350-500 base pairs. Used this region that to get the % of total value as well as the mean size in the selected region
- This will give an estimate for the number of sequence-able fragments in the range selected in the double digest sample
- Repeated the selection in the double digest sample for all of the same size selection ranges tested in the simulation above
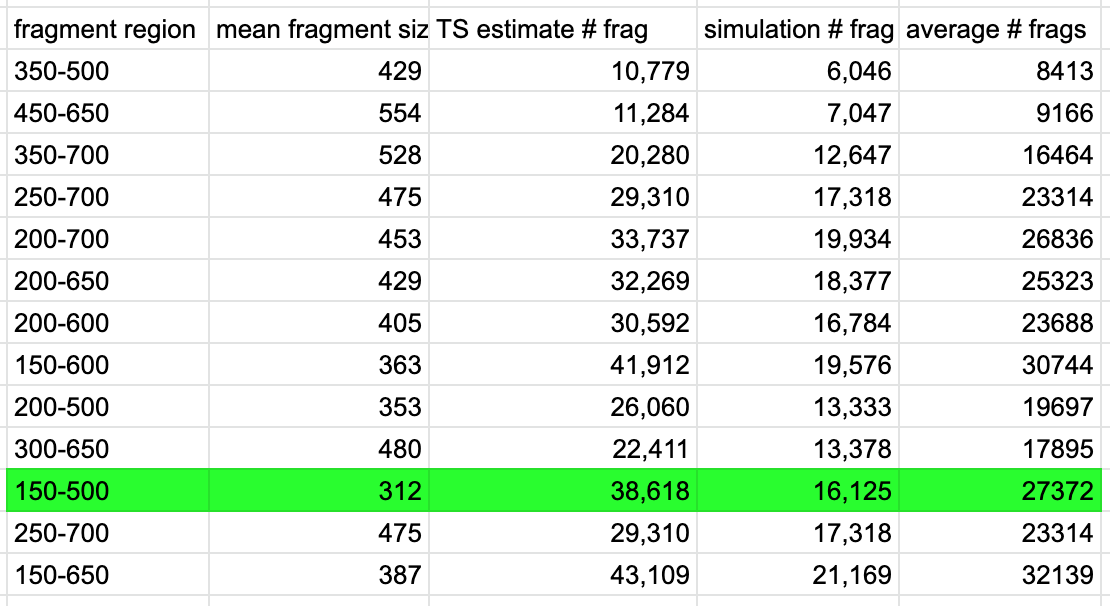
- Clearly there is a difference between both estimation methods, but taking the average of the two hopefully is the most accurate.
- We wanted between 20,000 and 30,000 fragments, and wanted a size selection window of less than 400bp (too broad). The BluePippin cassettes we had purchase had an upper limit of 600bp so that influenced the decision of insert size choice. The size selection step happens after adapter ligation, which adds about 93bp to each fragment. So we made the upper limit to our size range 593 and the lower limit 243. These number correspond to the actual insert DNA size range of 150-500bp.
Multiplexing Planing
It is always best to plan first before starting library prep on any of the samples. Even before planning, it is best to estimate how many samples you can run on one sequencing lane and still get the desired coverage you want. This is based off of what type of sequencing you are going to do, your estimate of fragments from 1 sample, what you want the coverage to be, and an estimate of how many reads that will be junk. Multiply the total number of reads by the % of reads that will be good, divide that by the number of fragments and finally divide that number by the coverage.
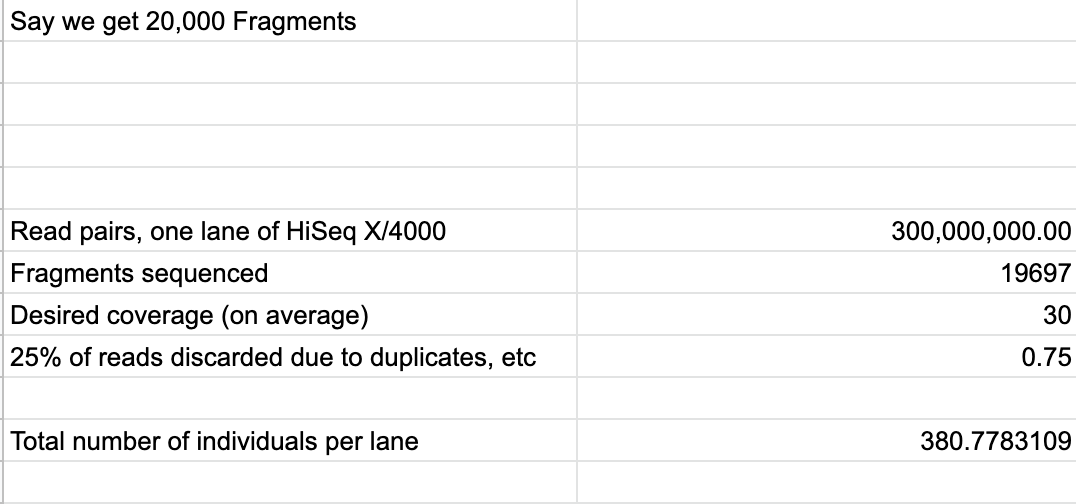 For Pocillopora, 274 libraries per lane is the limit. Because each sample needs to be digested with regular ddRAD enzymes and methylation specific enzymes, that’s actually a limit of 137 samples.
For this project only 56 samples were prepped so far, making 112 paired libraries. Additionally, 2 technical replicates were used in each pool making the total number of unique libraries 124. It is good to have at least one sample that you duplicate across each planned pool for a technical replicate. Chose a sample that has a lot of DNA because it needs to be the same sample in each pool. If you have flexibility in your ability to multiplex and how many samples to sequence do more technical replicates.
Each library to be made (2 per sample) needs a unique set of adapters and index pairs so that individual can be found bioinformatically after sequencing. Adapters are ligated to the sticky ends of double digested DNA and contain a unique barcode of know DNA sequence. The i5 adapters ligate to the PstI cutsite. The i7 adapters ligate to the MspI and HpaII cutsite. We have 12 unique i5 adapter barcodes and 4 unique i7 adapter barcodes (for this project we only had 6 i5s at the time). That means you can create 48 unique combinations with just the adapters, and that the maximum number of libraries in one pool is 48. A good way to determine how many pools to have is to divide the number of libraries you are going to make by 48.
For this project we could only do 24 libraries in a pool (only 6 i5s) so I divided the number of samples (112) by 24. This rounds out to 5 pools, before adding technical replicates. When adding in another 10 samples for 2 TRs per pool, that comes to 122 samples, which divided by 24 is over 5, so 6 pools actually needed to be made, making the full number of libraries 124. Technically, I could have made more pools, 12 if I wanted. You want to balance maximizing diversity in the sequences you add (aka the more different ones the better), but also save money by having as few pools as possible (number of pools determines how many size selections you do and how many QCs will be by the sequencing company, also want to minimize problems with size selection variability). You also want to plan the easiest plate set up possible because things can get confusing quickly with so many samples.
After size selection during PCR and index sequence is added to each library in a pool. We have 12 unique paired indexes. I planned things in a way that pool one got index pair 501-701, pool two got index pair 502-702 and so on.
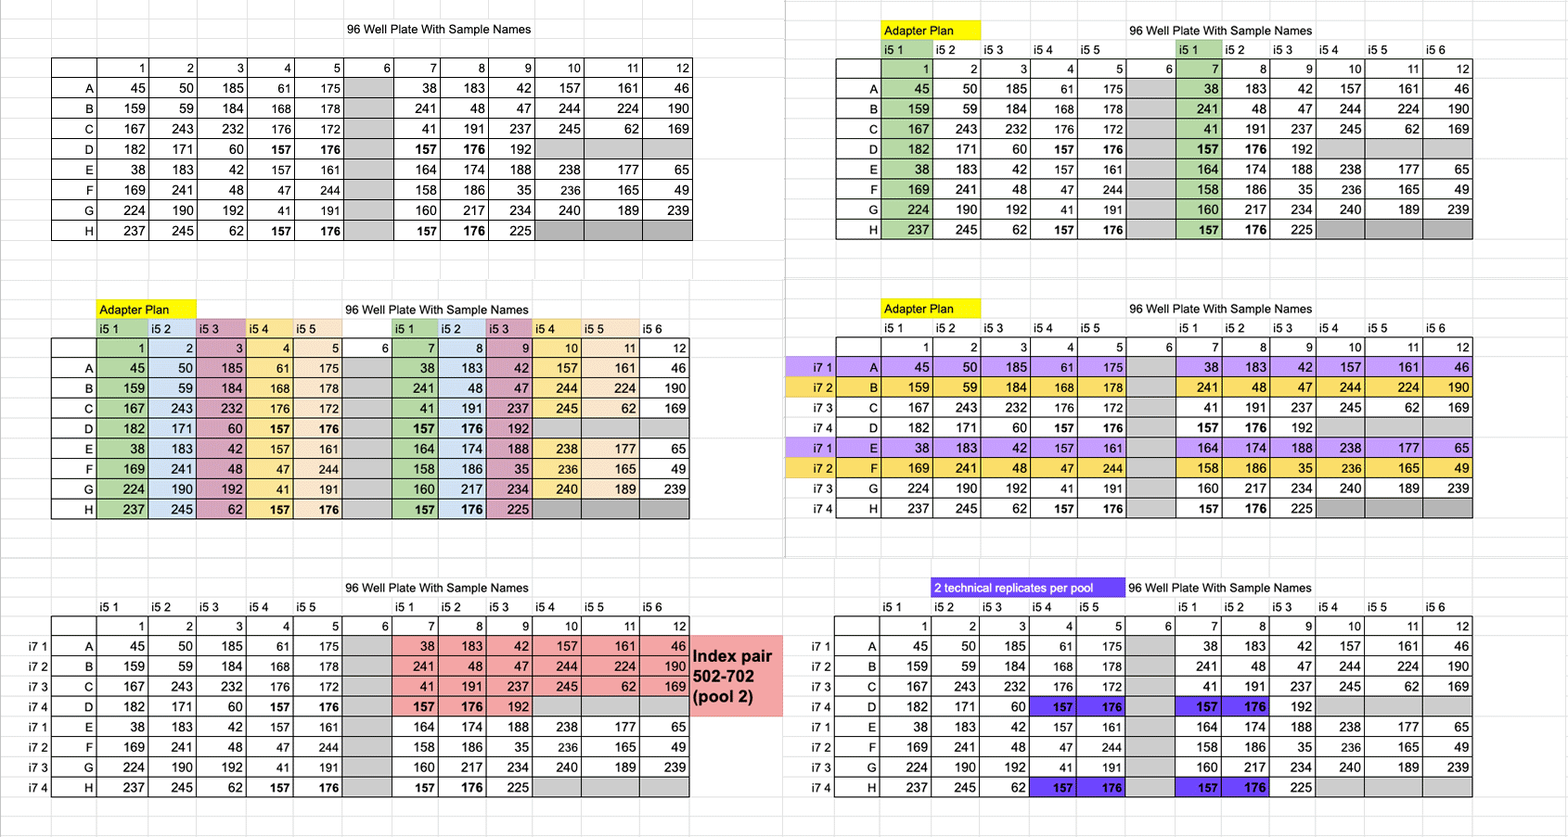
Planning the plate layout is also very important. You can chose to do separate plates for separate digestions (ddRAD vs EpiRAD), or if you do them on the same plate have them separated. This generally makes your pools also separated by what type of digestion they got. Because a plate has 12 wells going across the top and 8 down the side, it is easiest to plan for samples getting different i5 adapters in each column, and different i7 adapters in each row. The i7 adapters will have to be repeated for the 5th, 6ht, 7th, and 8th rows. This easily makes 2 even pools on one plate. If you don’t have that many samples per pool it is completely fine to leave some wells blank.
Depending on your project, you also want to randomly place samples into pools. For this project there were 4 sites sampled, so samples were placed randomly but somewhat evenly in pools by what site they were from.
See gif below for a visual representation of how the multiplexing was planned for one plate of the Pocillopora samples. Pools had between 20 and 22 samples in them, so there were blank spaces on the plates.
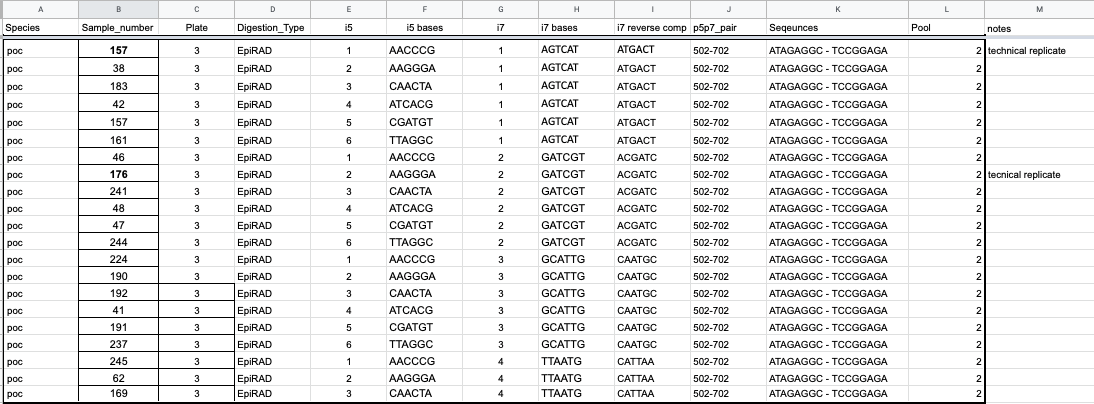
 You should also make a spreadsheet like this that clearly states what samples get what adapters, what indexes, and what the basepairs are for the barcodes and indexes.
DNA Prep
Notes
- The optimal DNA quantity 500 ng, Acceptable range is 200-500 ng. If you use more than 500 ng that my exhaust the enzymes and lead to incomplete digestion.
- Optimal DNA quality high molecular weight > 10kb
- Quantification can be done with the qubit protocol or with the plate reader and the AccueBlue assay
- To visualize DNA quality run a 1.5% agarose gel with a 1kb ladder, or run the genomic DNA TapeStation
After quantification, determine DNA quantity in each of the samples. We were limited by one sample that had low concentration and quantity of DNA, so for each digestion we started with 250ng.
Because all samples needed to be prepped twice (one ddRAD and one EpiRAD sample) you need two aliquots of 250 ng of DNA.
Steps
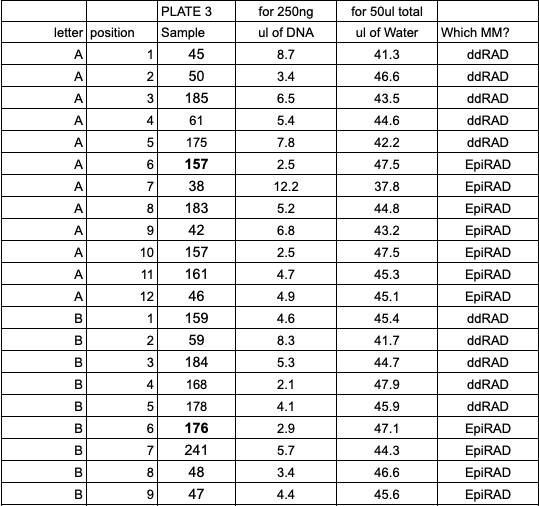
- Calculate volume of each sample needed for 250 ng and transfer that to a (new) 96 well plate, in the order you have planned above
- Calculate volume of water needed to add up to 50ul for each sample well Example calculations:
| DNA ng/μl quant | Volume to 250 ng | Volume water to 50ul | Total volume in well | 1X KAPA Pure Bead volume |
|---|---|---|---|---|
| 5.83 | 250/5.83= 42.88μl | 50-42.88= 7.12μl | 50μl | 1*50= 50μl |
A table like this can be printed out for checking off everytime something is added and for help when adding different samples to different locations on plates
The volume of KAPA pure beads needed for a 1X cleanup is 50ul. With a multichannel add 50ul of beads to each well in the plate with sample. You can pipette out the right amount of beads + some error into a trough. Try to avoid creating bubbles when adding beads and pipette up and down at least 10 times to mix. Perform a bead clean1 on the plates:
- After adding the beads, let the plate shake at room temp for 15 minutes
- Placed plate on the magnet stand and waited until the solution becomes clear
- Removed most of the clear liquid with the multichannel (~90μl) Note that you may not be able to remove all of the supernatant without disturbing the beads. Only remove the supernatant that does not contain beads. Supernatant with beads can be dispensed over the wall of the tube to encourage binding
- Added 200μl FRESH2 80% EtOH to each well while keeping it on the magnet
- Removed 180μl of the EtOH
- Added 100μl FRESH 80% EtOH to each well
- Removed ALL EtOH carefully from each well, using the p20 multichannel to get residual EtOH out
- Let samples sit for ~30 seconds, DO NOT LET BEADS DRY TO CRACKED but you want the EtOH to evaporate
- Took the plate off magnet and eluted in 68μl Nuclease-Free H20 (for a 80ul digestion reaction
Digestion
- Made master mixes for the planned digests: ddRAD and EpiRAD restriction enzymes (Example here is for plate 3, the same as in the multiplexing example above)
Depending on how the plate is set up you could be doing one or both - Calculated the n number: n = number of samples, plus pipette error. Ex. 40 ddRAD samples + 5 for error is 45. 42 EpiRAD samples + 5 for error is 47.
- ddRAD
10μl Cutsmart Buffer * 45 = 450μl
1μl PstI * 45 = 45μl
1μl MspI * 45 = 45μl - EpiRAD
10μl Cutsmart Buffer * 47 = 470μl
1μl PstI * 47 = 47μl
1μl HpaII * 47 = 47μl
- ddRAD
- Added 12μl of the appropriate master mix to each sample well, for a total reaction volume of 80ul
- Pipetted to mix and made sure all samples are at the bottom of the wells, our large centrifuge can hold 96 well plates (please balance). Used the foil stickers always to cover the plates
- Put the plate in Thermocyclers in the 12 hour digest program under the MES account (login 8888) overnight (37 degrees C for 12 hours then 4 degrees hold)
Cleanup and quant of digested samples
Cleanup
- To the 80μl in each well, added 1.8X FRESH PEG NaCl and pipetted to mix (144μl)
- Incubated plate on shaker for 15 minutes
- Placed plate on the magnet stand and waited until the solution becomes clear (this took a while, the magnet plate fits on the shaker and the shaking will help the magnetizing of the beads)
- Removed most of the clear liquid with the multichannel (~200μl) Note that you may not be able to remove all of the supernatant without disturbing the beads. Only remove the supernatant that does not contain beads. Supernatant with beads can be dispensed over the wall of the tube to encourage binding
- Added 200μl FRESH2 80% EtOH to each well while keeping it on the magnet
- Removed 180μl of the EtOH
- Added 100μl FRESH 80% EtOH to each well
- Remove ALL EtOH carefully from each well, using the p20 multichannel to get residual EtOH out
- Let samples sit for ~30 seconds, DO NOT LET BEADS DRY TO CRACKED but you want the EtOH to evaporate
- Removed the plate from the magnet and resuspended the beads in 33μl of Nuclease-Free H20 pipetting up and down many times to make sure the beads are fully mixed
- Centrifuged the plate to bring the beads to the bottom and keep the beads in!
Quantification
Used Broad Range AccuBlue on the plate reader to quantify how much DNA is in the samples.
- Took the buffer and standards out of the fridge at LEAST 30 min before use, it needs to get up to room temp, keep it in a drawer because the components are light sensitive
- Prepared working solution:
About a full plate is: 20mL buffer, 200ul dye, 200ul enhancer in a 50mL conical, cover with foil because the dye and enhancer are light sensitive
If you have a different number of samples: 200ul buffer per sample + 2ul dye per sample + 2ul enhancer per sample plus error (also include each standard you’re going to do here as a sample) - Vortexed to mix, and the large centrifuge can be used if needed
- Determined standards needed: probably not all of them (they go up to 200ng/ul, way higher than what was put in), which gives you room to do replicates of standards. For this protocol, two of the 0ng/ul, 2 of the 2ng/ul, two of the 6.25ng/ul, two of the 12.5ng/ul and one 25ng/ul standard are enough for a standard curve in the range the samples should be at
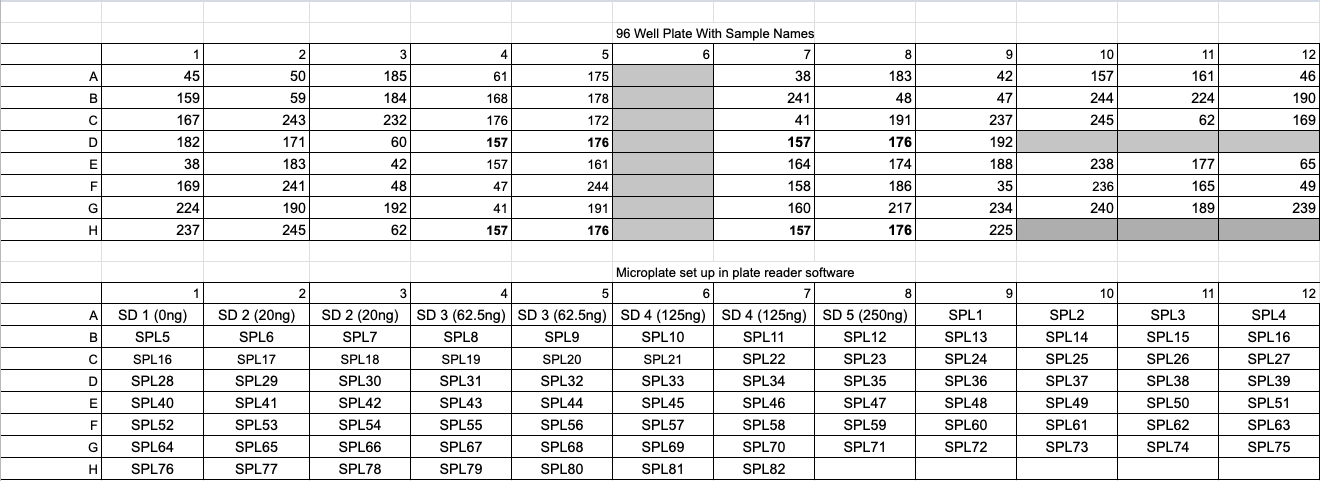
- For each well in a black 96 well microplate that is going to be used (the standards plus your samples), pipetted 200ul of the working solution. It is best to use a trough and a multichannel. Be mindful if the way you set up the microplate is a different layout than the way the sample plate is set up
- Added 10ul of the appropriate standard to the standard wells
- Added 2ul of sample to the appropriate well (this is different then the accublue protocol, they want you to use 10ul!)
- Covered the top with foil to block light and incubated on the shaker for 10 minutes (this also helped mix the samples with the solution)
- Turned on the plate reader and waited for it to start up (when it is done the little hatch opens and stays open)
- Opened the Gen5 software and chose the BiotiumBroadRangeDNA.prt protocol
- Click on the plate icon to set the plate layout
- Set the replicates for standards as where they are in the plate, as well as the samples, if you don’t use all the options on the program for standards that is fine, click ok if the program gives you an “error” because of this The standards are set as the number of ng added to each well, aka the 6.25ng/ul standard is set as 62.5 because that is how many ng were added in the 10ul. The standard curve is made by calculating the ng/well
- Set your samples where they are in your plate, make sure you know what SP1,SP2, SP etc are in how they pertain to your actual sample #s
- Any well that has nothing in it do not click anything leave it white
- Once the bulb has warmed up place the black plate into the holder, remove foil, and press start
- It takes less than a minute to read, and once done click on statistics and graphs tags to look at the readings
- First open excel on the computer (for some reason if you don’t have the excel welcome window already open, the Gen5 software won’t let you copy to excel)
- Press the little excel sheet button on anything in the Gen5 file that you want to copy (the graph of the curve, the statistics table with the ng/well column (from dropdown menu), the table with the curve fitting details, and it will all get copied to one excel file
- Then you can make another column in the excel doc for ng/ul because you know you added 2ul of sample to each well to make that calculation
Ligation of adapters
Make sure all barcodes and indices are planned at/before this step!!
- Placed the plate with the digested DNA and beads on the magnet and wait3e until the liquid goes clear
- Remove all the of the clear liquid into a NEW 96 well plate keeping the same sample orientation
- Make sure adapters are diluted down to a working stock solution.
See calculator here for general calculation or here for specific to this protocol - Sample by sample, add back the required volume of sample for 100 ng into the same well with the beads it was in before. It is imperative that you do not mix up wells and samples For one sample per plate, make an extra ligation well with the correct amount of DNA and water. Chose a sample that has enough DNA. This sample will be used up for a ligation efficiency test.
- For this, making a print out of the plate with the volume needed for each well is a really good idea, same with for the amount of water needed in the next step. It is completely likely that almost all wells will require a different volume and it can get confusing very fast.
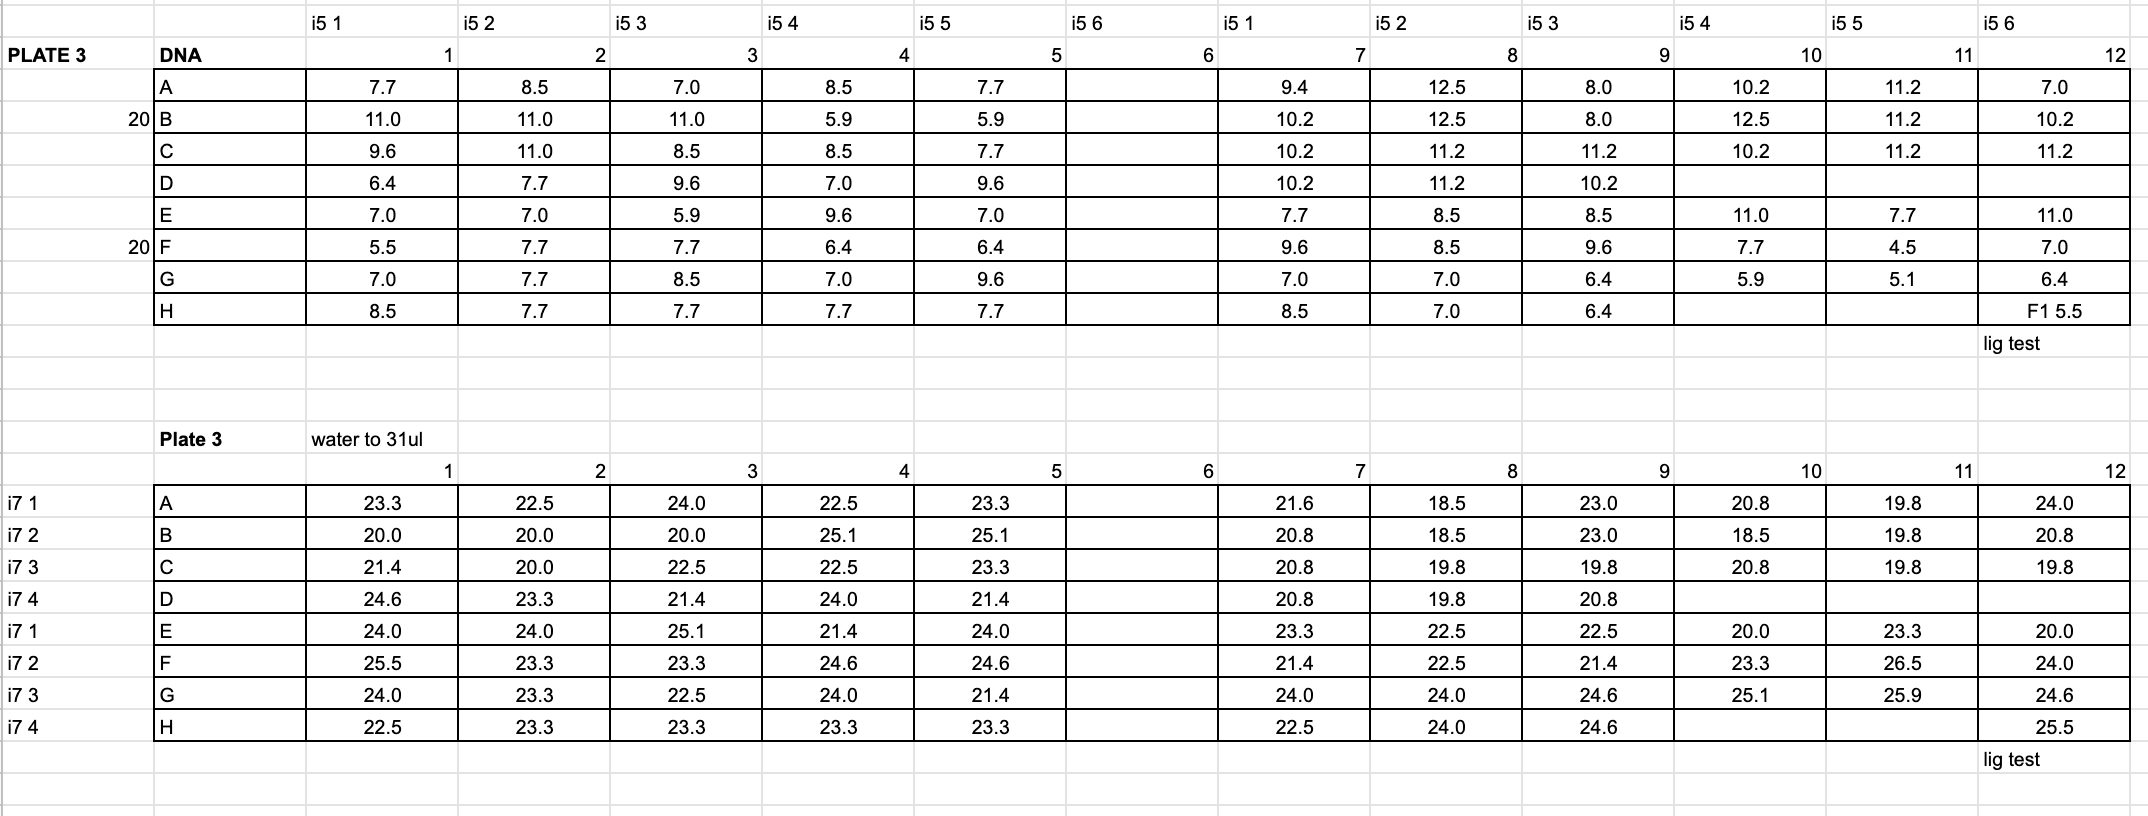
- For this, making a print out of the plate with the volume needed for each well is a really good idea, same with for the amount of water needed in the next step. It is completely likely that almost all wells will require a different volume and it can get confusing very fast.
- For samples that need it, add enough nuclease-free H20 to equal 31μl for a planned reaction volume of 40ul
- Create the ligation master mix on ice (Ex. n = 90):
- 4μl of 10X ligation buffer * 90 = 360μl
- 1μl of T4 ligase * 90 = 90μl Add this last. It is always good practice to add enzymes last to any master mix. Make sure the ligase is 400,000 units/mL!
- Added 5μl of the ligation master mix to each well
- Added 2μl of the correct planned i5 adapter working stock (~1uM) and 2μl off the correct planned i7 adapter working stock (see calculators for making working stocks, Very important if you don’t dilute your adapters your libraries are useless)
- If you planned the plates in a way that strip tubes of adapters can be aliquoted and then multi-channel pipetted into the wells, that is a quicker way the adapters were added to multiple wells at the same time.
Strip tubes were made for i5 adapters to be added horizontally (each column a different one), same with the i7 adapters being added horizontally (each row a different one). Again, I found it easier to print out maps of the plate and where each adapter was going so that I could double check and highlight when added.
- If you planned the plates in a way that strip tubes of adapters can be aliquoted and then multi-channel pipetted into the wells, that is a quicker way the adapters were added to multiple wells at the same time.
- Covered with foil and spun down plate
- Incubated plate at room temp (~23℃) for 3 hours, then heat kill the ligase by at temp increase to 65℃ for 10 minutes, then cool the solution at 2°C per 90 seconds until it reaches room temperature, then go to a hold at 4°C. This is in a program called RAD LIGA under the JONP user in the thermocycler (login 1234)
Pooling and two clean ups
Test for ligation efficiency
- Purified the ligation control sample with 1.5X room-temp. KAPA Pure beads (40uL rxn X1.5=60μl) and two 80% ethanol washes as above. Resuspended and eluted beads in 20μl nuclease-free water.
- Prepared 2 PCR reactions on ice for the test ligation as follows using any pair of forward and reverse primers
- Made PCR master mix with:
4μl nuclease-free water * 2.2 = 8.4μl
10μl KAPA hot start ready mix (2X) * 2.2 = 22μl
.5μl forward primer 20uM * 2.2 = 1.1μl
.5μl reverse primer 20uM * 2.2 = 1.1μl - Added 15μl master mix to 2 new PCR tubes
- Added 5μl test ligated DNA to each tube
- Made PCR master mix with:
- Ran two different PCR programs: the 12 cycle RAD LIG TEST program and the 30 cycle RAD LIG TEST program (under the JONP user in the thermocycler (login 1234))
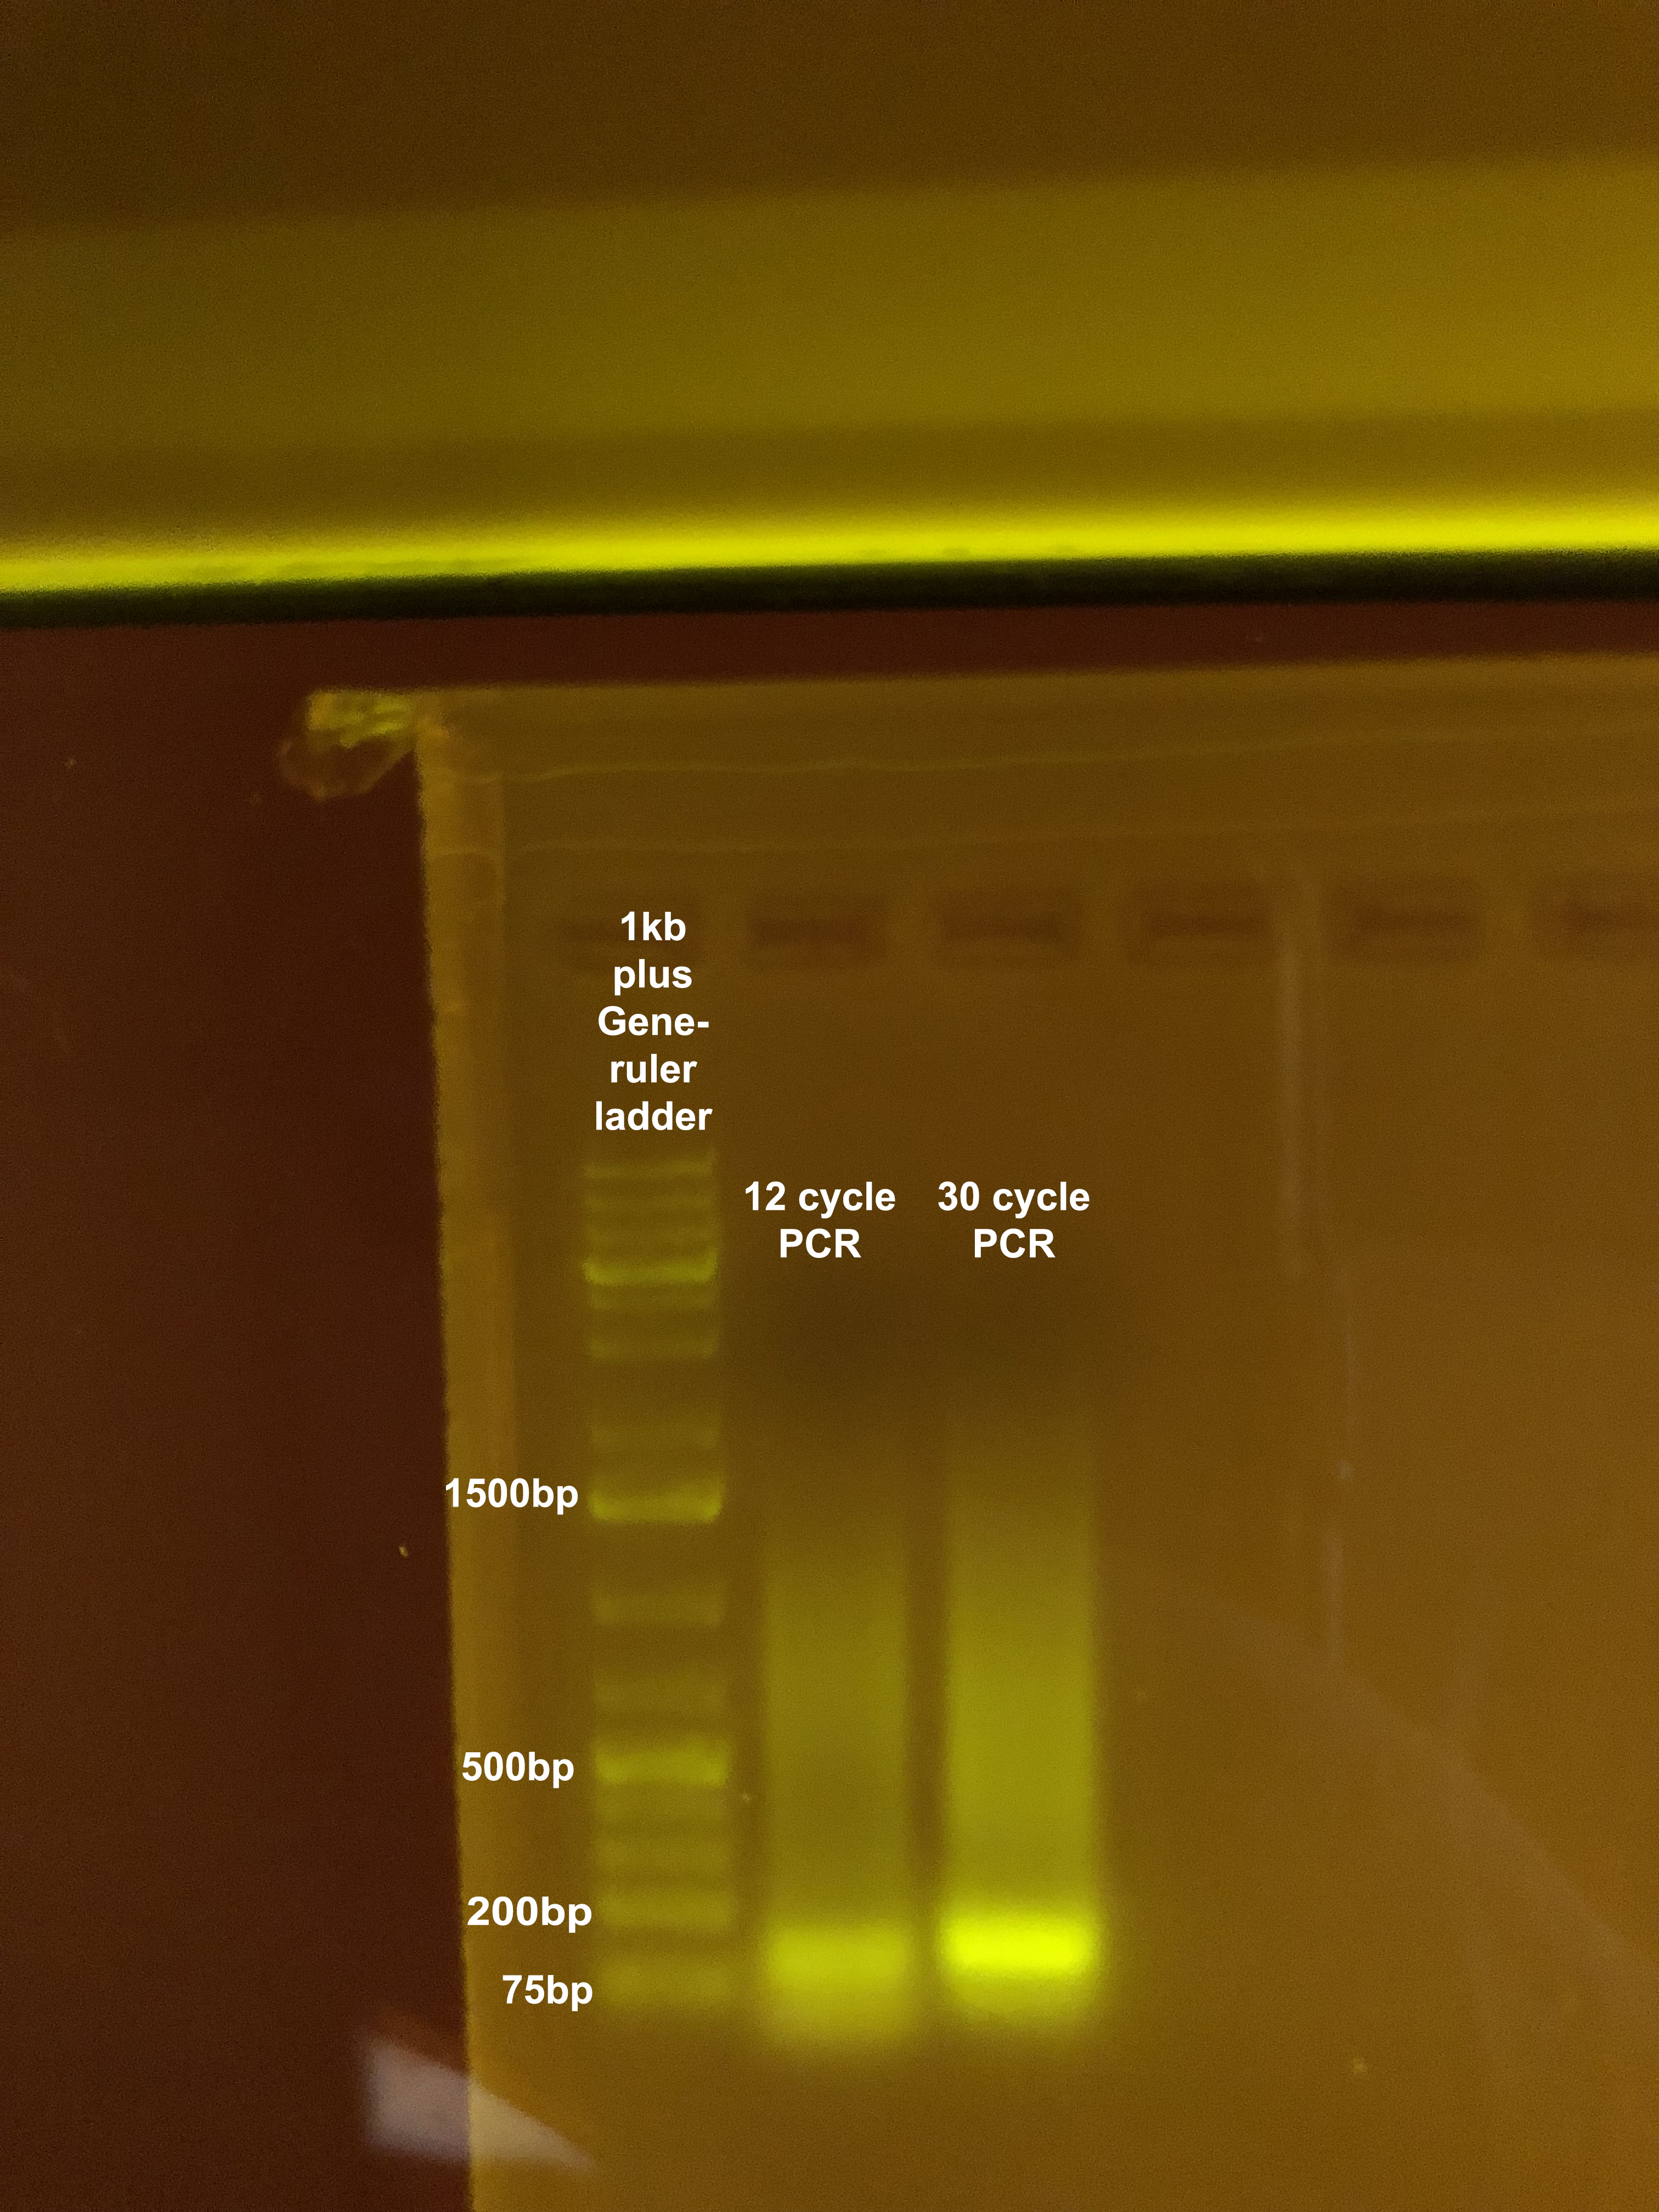
- Ran both PCR reactions (all 20μl, unpurified) on an agarose gel with a 1kb plus ladder.
- The 30 and/or 12 cycle PCRs should appear on the gel, indicating an increase in DNA concentration resulting from effecting priming of the fragments (and hence effective adapter ligation).
Generally, the 30 cycle PCR shows a shift in distribution towards smaller fragments owing to the more efficient amplification of smaller fragments (and hence also why we only use 12 cycle PCRs in the final protocol steps as to minimize bias that comes with PCRs). The 12 cycle PCR may also show some unincorporated primer dimers.
Pooling
- Samples are pooled by index to be added during amplification and then bead cleaned twice to remove any left over adapter before size selection. Make sure you tested for ligation before pooling! If adapters did not ligate you would pool samples together and never be able to tell them apart again (also, they wouldn’t amplify).
- For each pool: Transfer the full 40μl of ligation reaction for each well, including the beads, to a single 1.5mL tube. It might help to pipette mix first to make sure to transfer all the beads.
- For each pool: split the 1.5mL tube into 4 tubes with equal volume in each for separate 1.5X cleanups, use a p200 pipette 50μl to make sure each tube has the same volume (Pools will be slightly different volumes if you have different numbers of samples in each, so calculate the amount in each tube separately for accurate splitting). Example:
- 20 samples in 1 pool means a total volume of 40 * 20 = 800μl
- Split the pool evenly between four 1.5mL tubes, 200μl each
- Added 1.5X of PEG NaCl to each 1.5mL split tube, which is 1.5 * 200 = 300μl
- Incubated the tubes on shaker for 15 minutes
- Placed tubes on the magnet bar (long one) and wait until the solution goes clear. You can pipette to encourage the beads to move to the magnet
- Removed as much clear liquid as possible without removing any beads (for the example above that is about 490μl)
- Added 1000μl FRESH2 80% EtOH to each tube while keeping it on the magnet
- Removed 900μl of the EtOH
- Added 1000μl FRESH 80% EtOH to each tube
- Removed ALL EtOH carefully from each tube and let samples sit for ~2 minutes, DO NOT LET BEADS DRY TO CRACKED, you can use a pipette tip to remove any EtOH blobs
- Recombined the 4 separated tubes back together into one tube (1 for each pool) with the beads
- Added 1.5X PEG-NaCl (240μl) to each tube, mix by pipetting, and incubate on a shaker for 15 minutes this volume of PEG NaCl will always be the same
- After incubation, placed the tubes on the long magnet rack, wait until the liquid became clear, and removed as much of the clear liquid as possible without disturbing the beads
- Added 1000μl FRESH2 80% EtOH to each tube while keeping it on the magnet
- Removed 900μl of the EtOH
- Added 1000μl FRESH 80% EtOH to each tube
- Removed ALL EtOH carefully from each tube and let samples sit for ~2 minutes, DO NOT LET BEADS DRY TO CRACKED, you can use a pipette tip to remove any EtOH blobs
- Removed tubes from magnet and added 60μl of 1X TE buffer to each tube and pipetted to mix. Incubated for 5 minutes on the shaker
- Why 60μl? Putting all of your elution on the Pippin Prep is risky. One, it’s always a good idea to have some left over at every step in case you need to repeat it, or compare it to a later library. Two, in some cases, it appears the Pippin is sensitive to the amount of DNA loaded (despite a rating of up to 5ug)
- Put tubes back onto the magnet and wait until the liquid goes clear, then removed supernatant and transferred to a new tube for each pool
BluePippin Size Selection
- Transferred half (30μl) of each ligation pool (in 1XTE) to a new labeled tube (1 tube per pool/index). This should correspond to 20-25ng of barcoded DNA per sample.
- It is recommended not using more than ¼ to ½ of the pooled ligation in any run of the Pippin due to variations in product size between runs, and occasional machine failures. This preserves the ability to run the ligations one or more additional times to achieve the desired size fractionation
- Mainly, follow the BluePippin protocol for the cassette you have
- Make sure the buffer and marker are out at room temp before starting (kept in 4 degree fridge)
- Pipetted to mix each 30μl of pooled ligations (in 1X TE) with 10μl of Marker V1. Vortex briefly and quick spin to collect
- Prepped basket to bring upstairs to the Genome and Sequencing Center:
- p20 pipette and tips
- 1 extra cassette than you need just in case one continuously fails tests
- Marker and buffer
- Samples
- Gloves
- Pamphlet about the BluePippin
- Tubes for storing the sample after size selection
- 0.1% tween
- Good vibes
- Turned on the BluePippin and the computer associated with it
- Calibrated the machine: placed the calibration fixture (in the drawer stored in a sock) on the electrodes, closed the lid and pressed calibrate
- Took out one cassette and inspected carefully, tapping away any bubbles behind the elution chambers. Make note if this cassette has some used wells, look to see if all buffer chambers are full, look for breaks or cracks in the gel if you see problems with one gel lane, do not use that one!
- Placed cassette in nest and removed stickers
- Removed all the buffer in the elution wells, and then replaced it with 40μl of fresh electrophoresis buffer. You have to use the p20 here because the tips are the only ones thin enough to fit in the opening
- Checked all sample well buffer levels and performed the continuity test (must pass all lanes you are going to use, if some lanes have been run before it’s ok if those fail, if it fails unused lanes, remove and replace all buffer in elution wells and try test again)
- Removed 40μl of buffer from each sample well to be used and replaced with the 40uL of sample/Marker V1 solution
- Selected the program in the software or go to the protocol manager tab and create a new one
- Made sure reference is set to internal for all lanes, if some lanes are not to be used turn the reference off on just those lanes
- Made sure the correct range of base pairs (ex. for Pocillopora it is 243-593bp)
- Made sure marker on the top dropdown window is V1
- Re-inspected the settings on the main page and named the lanes. Press start if all is good
- The program will stop when elution is finished, so even though it says it will go 8 hours, it will probably stop at ~17% “done”
- Removed the entire volume from the elution wells and placed into new tubes. Volumes range between ~35-50μl
- Added 40μl 0.1% tween to each elution well, waited 1 minute, and then removed the same 40μl into separate tubes. In theory a % of the sample is recovered with a rinse with tween
- Reviewed the run log to ensure that the standards were observed. If it didn’t detect peaks then it won’t elute that lane ever, so you might as well just stop the run if that happened. Also look for spikes in the voltage early in the run: voltage near or above 2.5mV cause the DNA to run at unpredictable rates (despite the internal standards). If spikes are observed, check the size of the final library (post-PCR) and/or the pre-PCR elution on the TapeStation
- Post-Size Selection Qubit:
Use HS dsDNA Qubit protocol but use 2μl of digested DNA for each pool This is going to be a small amount because you removed a lot of your sample, less than a ng/ul
Index addition and amplification
- For each pool: set up 6 PCR reactions
- Made a master mix separate for each pool, with it’s specific primer/index pair. Example: pool 2 had index pair 502 and 702
- 10µl of 2X KAPA HiFi Hot Start Ready Mix * 6.1 = 61µl
- 4µl water * 6.1 = 24.4µl
- .5μl 20uM PCR primer 502 * 6.1 = 3.05µl
- .5μl 20uM PCR primer 702 * 6.1 = 3.05µl
- Combined 15μl of the master mix and 5μl of size-selected DNA in new strip tubes for a total reaction volume of 20μl in each tube. If you doing multiple pools it might be easier to do the amplifications in a 96 well plate
- Put in the Thermocycler for amplification, 12 cycle RAD PCR program under the JONP user:
- 1 cycle of 98°C for 1:00 min
- 12 cycles of 98°C for 10 seconds
- 62°C for 30 seconds
- 72°C for 30 seconds
- 1 cycle of 72°C for 10 min
- Hold at 4°C
- After the PCR, combined the 6 reactions into a single 1.5 mL tube, for a total of 120μl
- Added 1.5X of KAPA Pure Beads (180μl) to each pooled tube, mixed by pipetting, and incubated on a shaker for 15 minutes
- Put the tubes on the magnet rack, waited until the liquid became clear, and removed as much of the clear liquid as possible without disturbing the beads
- Added 1000μl FRESH2 80% EtOH to each tube while keeping it on the magnet
- Removed 900μl of the EtOH
- Added 1000μl FRESH 80% EtOH to each tube
- Remove ALL EtOH carefully from each tube and let samples sit for ~2 minutes, DO NOT LET BEADS DRY TO CRACKED, you can use a pipette tip to remove any EtOH blobs
- Took tubes of the magnet rack and resuspended the beads in 35μl nuclease-free water and incubated the tubes shaking for 5 minutes
- Placed the tubes back in the magnet, and waited until the liquid goes clear. Removed all clear liquid and put into new tubes. These are the libraries!!
Final library quant and visualization
- Used the BR dsDNA Qubit protocol to get the ng/μl of library. Run this twice, as in re-make the standards and new sample tubes
- Analyze the accuracy of the Pippin Prep and the addition of the flowcell and primer sequences by running a TapeStation on all the samples.
The PCR reaction adds 55bp of Illumina flowcell annealing sequences. Thus, library size after PCR should be similar across library indices, and somewhat add up to your size selection range + 55bp
It is critical that the sizes be similar between indices of this library (and all other libraries for which data are to be combined) to ensure that the loci included are the same. If the size ranges are not the same across samples are wrong, you have to go back to size selection with section 8 (why you save 30μl)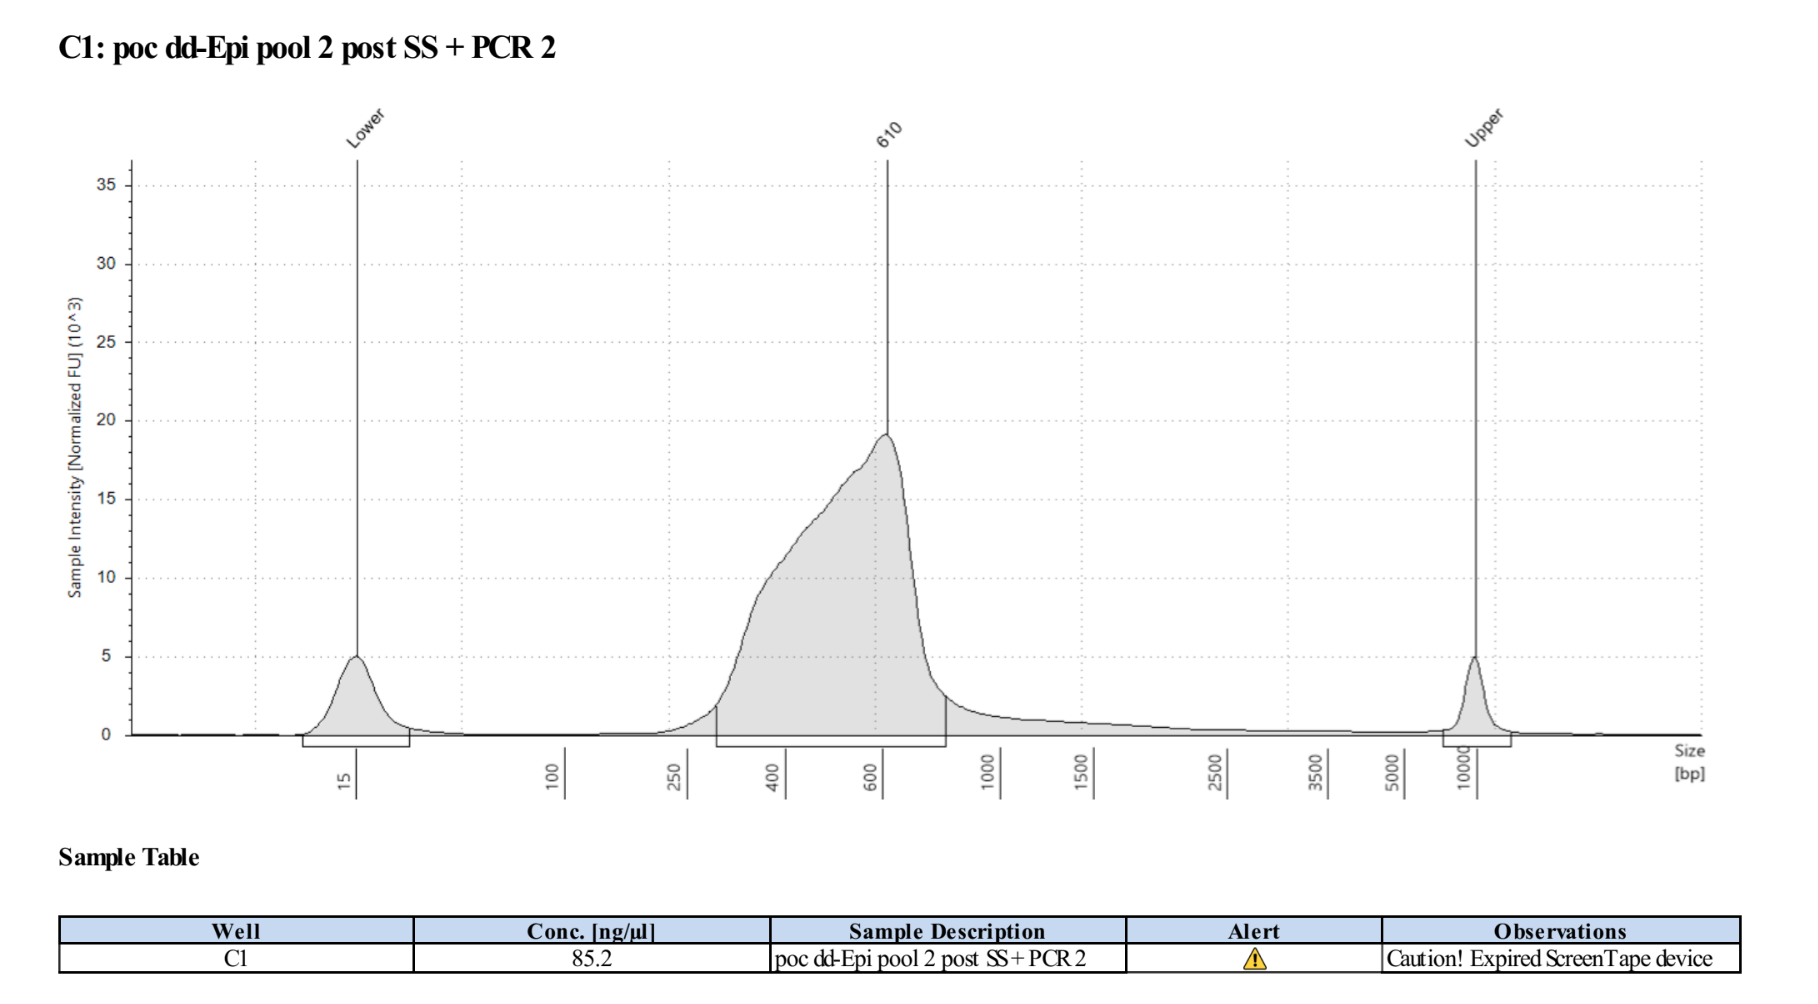 Final libraries look weird because it isn’t going to be a normal distribution of fragment sizes, what is important is that all your pools have basically the same size range, ex here as in ~250-650bp.
Notes and glossary
KAPA Pure Beads: Beads are used to clean enzymes and any other impurities out of the solution with your DNA. The beads will bind the DNA in a concentration and size dependent and you can wash out all the other molecules in the tube (ex. Buffer, restriction enzymes etc.) then you can elute the DNA from the beads. The higher the ratio of bead solution/PEG the more smaller fragments are retained. The beads are magnetic and will be pulled to the side of the tube with a magnet stand allowing you to take out the other liquid in the tube.
FRESH 80%EtOH: Make your EtOH fresh that day. After 24 hours your 80% won’t be 80% anymore and will have become more hydrated.
Master Mixes: Master mixes reduce the variance in measuring small volumes because larger volumes require less accuracy to achieve a higher precision on a per-sample basis than would be achieved by pipetting directly. To create a master mix, combine the reagents in proportion to the total number of samples, plus ~5-10%. For a 96 well plate, multiply the reagents (per sample) times 100 or 105. E.g. 10uL buffer per reaction = 1000uL in the master mix for 100 samples. Then, dispense the required volume of the mix separately into each reaction (changing tips with each dispensing).
Restriction enzymes used in this protocol:
PstI: Restriction Enzyme used in both ddRAD and EpiRAD digestions that recognizes this sequence: CTGCAG
MspI: Restriction Enzyme used in ddRAD digestion only that recognizes this sequence: CCGG
HpaII: Methylation Sensitive Enzyme, won’t cut if there is a methylated GpG at CCGG for EpiRAD digestion only
PEG-NaCl: The salt solution that the beads are in, and this solution facilitates binding of the DNA to the beads. Keep freshly made PEG in the fridge and in a foil wrapper away from light. To make use 25mL of 5M NaCl solution, 10g of Polyethylene gylcol 8000, and ultra pure water up to 49ml in a 50mL conical. Mix on the shaker until fully combined.
Adapter: Fully or partially double-stranded product of annealing two oligos. Adapters are ligated to genomic DNA at restriction enzyme cut sites in order to add barcodes and common PCR priming sequences. Ours contain barcodes (See below).
Barcode: Short known DNA sequence downstream of the sequencing primer annealing region of an adapter. Used to resolve products of different ligation reactions (usually separate individuals) after sequencing pooled libraries.
Index: Short known DNA sequence introduced during PCR amplification of the final library that uniquely identifies products of that PCR reaction. Used combinatorially with Adapter barcodes to resolve multiplexed sample pools. Make sure that your pools for indexing DO NOT contain samples with the same barcodes.
BluePippin: The BluePippin (or other Pippin machine, e.g. Pippin Prep) is our preferred method of size selection, and the one recommended by Peterson et al. (2012). It is advertised as producing more consistent and precise size selection than gel extraction. It should be noted, however, that the efficacy of the Pippin MAY be affected by the mass of DNA loaded and temperature. In particular, we have found that runs made at different temperatures produce size fractions different from what is targeted, with optimal conditions around 68-70F (warmer produces larger fragments, cooler produces smaller fragments). However, we recommend that users confirm the size of the Pippin eluate (or more commonly, the post-Pippin PCR product, allowing for the increase in fragment length due to the PCR primers; see below) on a TapeStation or similar apparatus, and adjust the targeted size as necessary. Also, increasing the size of the target window may help to create more overlap between runs with some discrepancy between target midpoint and median fragment size produced.
Library: A collection of sequencing-competent fragments.
Materials and equipment
Materials
- Zymo Quick-DNA Miniprep Plus kit
- Beads for homogenization
- 100% Ethanol
- Ultra-pure/nuclease-free water
- KAPA Pure beads
- Amplification Master Mix
- TE buffer
- 5M sodium chloride
- Polyethylene glycol 8000
- AccuBlue® Broad Range dsDNA Quantitation Kit
- HS dsDNA Qubit Quantification kit
- BR dsDNA Qubit Quantification kit
- D5000 DNA Tapestation supplies, D5000 reagents: #5067-5589. D5000 tapes: #5067-5588
- Genomic DNA Tapestation supplies, Genomic reagents: #5067-5366. Genomic tapes: #5067-5365
- T4 DNA ligase, #M0202L
- T4 DNA ligase reaction buffer
- High fidelity PstI restriction enzyme, #R3140M
- MspI restriction enzyme, #R0106M
- HpaII restriction enzyme, #R0171L
- BluePippin Supplies, materials in this protocol are:
- RNase, DNase, DNA & PCR inhibitor free 1.5mL tubes
- Semi-skirted 96 well plates
- Foil seal for 96 well plate
- p1000, p200, p20, and p2 pipette tips
- PCR strip tubes
- Gloves
Equipment
- Sage Science BluePippin
- Orbital shaker
- Eppendorf Mastercycler Pro
- BioTek Synergy HTX Multimode plate reader
- Qubit Fluorometer
- Eppendorf Thermomixer
- Aglient Technologies TapeStation 4200
- p1000, p200, p20, and p2 pipettes and multichannel pipettes
- Benchtop mini centrifuge
- Centrifuge capable of doing 96 well plates