Practice Loading and Running a Gel for HMW DNA using the NEB MidRangePGF Marker
20211102
Notes
- I ended up making the gel on Tuesday afternoon and waiting until the next day to run it. I wanted to have the most time possible to run the gel
- Our largest gel is 180mL, it’s way wider than what I need but it is also the longest one there is - aka I can run the gel the longest
- I also wanted to make the lowest percentage gel I could, Kistie’s suggestion was a 0.7% gel which is the lowest she ever makes. One of the ladders I used suggests using a 0.4% gel, but I’m not sure a gel that light would hold up for the run/imaging
- This is just a test gel, none of my HMW samples are in it. The PGF marker is stored in an agarose plug that has to be sliced off, placed in the well, and sealed with agarose to work. I wanted a chance to test it out (as well as how long and how fast to run it) before putting my precious samples in there
Making the Gel
- Made 2 more bottles of 1X TAE to fill the large gel box:
- 20mL 50X TAE
- 1L distilled water
- Set up the tray for casting: the large gel does not have any case or set up for casting the gel, you have to use lab tape. Tape was lined up along the long edges of the tray and pressed down with a fingernail with a lot of pressure. This was went over a few times to make sure it was sealed. The tray was placed on an empty part of the bench to be a flat as possible
- Made 0.7% gel mix:
- 180mL 1X TAE
- 1.26g agarose (this ended up being ~1.3g)
- The gel was microwaved for 1 min intervals for ~4 minutes until the liquid boiled and was completely clear
- I also weighed the liquid before and after microwaving to see if I should add back in water that evaporates. The before volume was ~374g and the after was ~364g. I’ve never adjusted gel volume with water before so I decided not to do it in this case, there didn’t seem to be a lot of water loss
- I pipetted out ~3mL into 1.5mL tubes and put in the heat block at 65 degrees C - these are for sealing the wells
- Let the gel liquid cool down to maybe 65 degrees C (this was by touch) because hotter gels and cause problems with the tape for gel casting. I let it sit maybe 7 minutes on the bench
- Poured the gel carefully and used all of the volume
- Put in the the comb: used the comb that is sitting the lowest
- Gel cooled in about 20 minutes
Loading the Ladder
- Took out the combs but left the gel in the tray, with the tape, on the bench. Do not put the gel in the box with TAE yet
- Got ladder plug out of the freezer
- Sliced off the smallest amount of the plug I could, this was probably less than a mm thick. Used a razor blade and pushed out the plug (in a syringe type thing) to slice it. The “round” stayed on the razor blade
- Used a p2 pipette tip to manipulate the round into the wells
- The wells were too small width-wise to get the whole round in without changing it’s shape
- The first round I pushed in broke in half during the process, and I put the second half in the well next to it
- In the third well, I cut in half another round, and put each half in the well
- In the fourth well I really carefully cut a round and slid it into the well, to get it to fit I got the edges of the round to fold over on themselves (kind of like a burrito), and I don’t think the round actually broke when doing this
- Took the gel 1.5mL tubes from the heat block and let them sit in a rack at room temp for 3-4 minutes to cool down a little (too hot agarose will destroy the DNA in the ladder)
- Added 10mL of the cooled-saved gel liquid to the wells with the rounds to seal the wells. They weren’t full so I used another 10ul for about 20ul in each well
- Here I had a problem with the rounds not sitting all the way flat and to the bottom of the wells. When I added the gel liquid, bubbles were left at some of the bottoms of the wells. You can’t have a bubble in the gel or the DNA can’t migrate. The 1st and 4th wells didn’t really have any bubbles. The 2nd and 3rd wells did have bubbles, and I had to pipette around a few times, moving the round and trying to suck up the bubbles. I did not know how much I disrupted the round or the integrity of the well by doing this. Well 2 had tiny bubbles still left in it that I couldn’t get out
- While the wells were solidifying, I practiced adding gel to the wells by cutting off a piece of the gel that I’m not using (the lower left side), slicing it thin, and sliding it into wells. This didn’t work super well because the gel I made is not as rigid as the plug gel, and I didn’t cut it into a perfect cylinder shape. But it probably helped me get used to sliding things into wells carefully. When I try this next time I will need to make sure I slide the round in flush against the front or back of the well, and push it down so the bottom touches the bottom of the well. I can also try attaching a larger comb to the comb set up that fits with this tray. I might be able to tape on a smaller set of combs that have super wide wells
- After the wells cooled I prepared the gel for storage overnight:
- Poured in a little 1X TAE into the tray (still had the tape)
- Double bagged the tray (1 gallon bag doesn’t fit the whole thing) and sealed it with lab tape to be air tight
- Placed the tray in the 4 degree fridge overnight
20211103
Running the Gel
- Took out the gel right when I got in so it could warm up to room temp before using
- Once warmed, poured off the TAE into the gel box and took off the tape (carefully, don’t want the gel sliding around!!)
- Put the tray in the gel box, wells on the black electrode side
- Deciding for voltage and time:
- Based the voltage off the largest regular gel ladder we have (48kb Thermofisher GeneRuler High Range DNA Ladder), the PFG marker only gives recommendations for a PFG (pulsed phase gel)
- The 48kb ladder says to run it at 3V/cm. The gel is 15.24cm so I’m going to run the gel at 46V
- The 48kb ladder also says to run it on a 0.4% gel for 1.5 hours. My gel is a little below twice that density, and I need to resolve out larger bands in the PFG marker. So my guess it to run it for 4.5 or 5 hours
- Made up 48kb ladder:
- 1.2ul ladder
- 6ul loading dye
- 28.8ul molecular grade water
- I already have 4 wells with the PFG marker, then I’m going to make 2 wells with the 48kb ladder, 1 well with a 1kb plus ladder, and 1 well each of the puregene extracted DNA. The DNA samples should not be super HMW but I wanted to see how “regular” DNA would run in this gel and these are my only samples with enough DNA to show on a gel (but I don’t need them for anything)
- I used 10ul of the 48kb ladder, 6ul of the 1kb plus ladder, and 5ul of the samples (plus ~1ul of dye) for the gel
- Let the gel run for 5 hours and 10 minutes at 46 volts
- Afterwards let the gel incubate in the EtBr bath for ~45-60 minutes
- When sliding the gel off the tray into the bath, it folded over and broke in half length-wise. It also flipped over. I was still able to image it fine and put the two pieces together for a coherent image, but the low percentage gel is fragile so I need to be careful and make sure to use both hands when maneuvering it around
- Gel image:
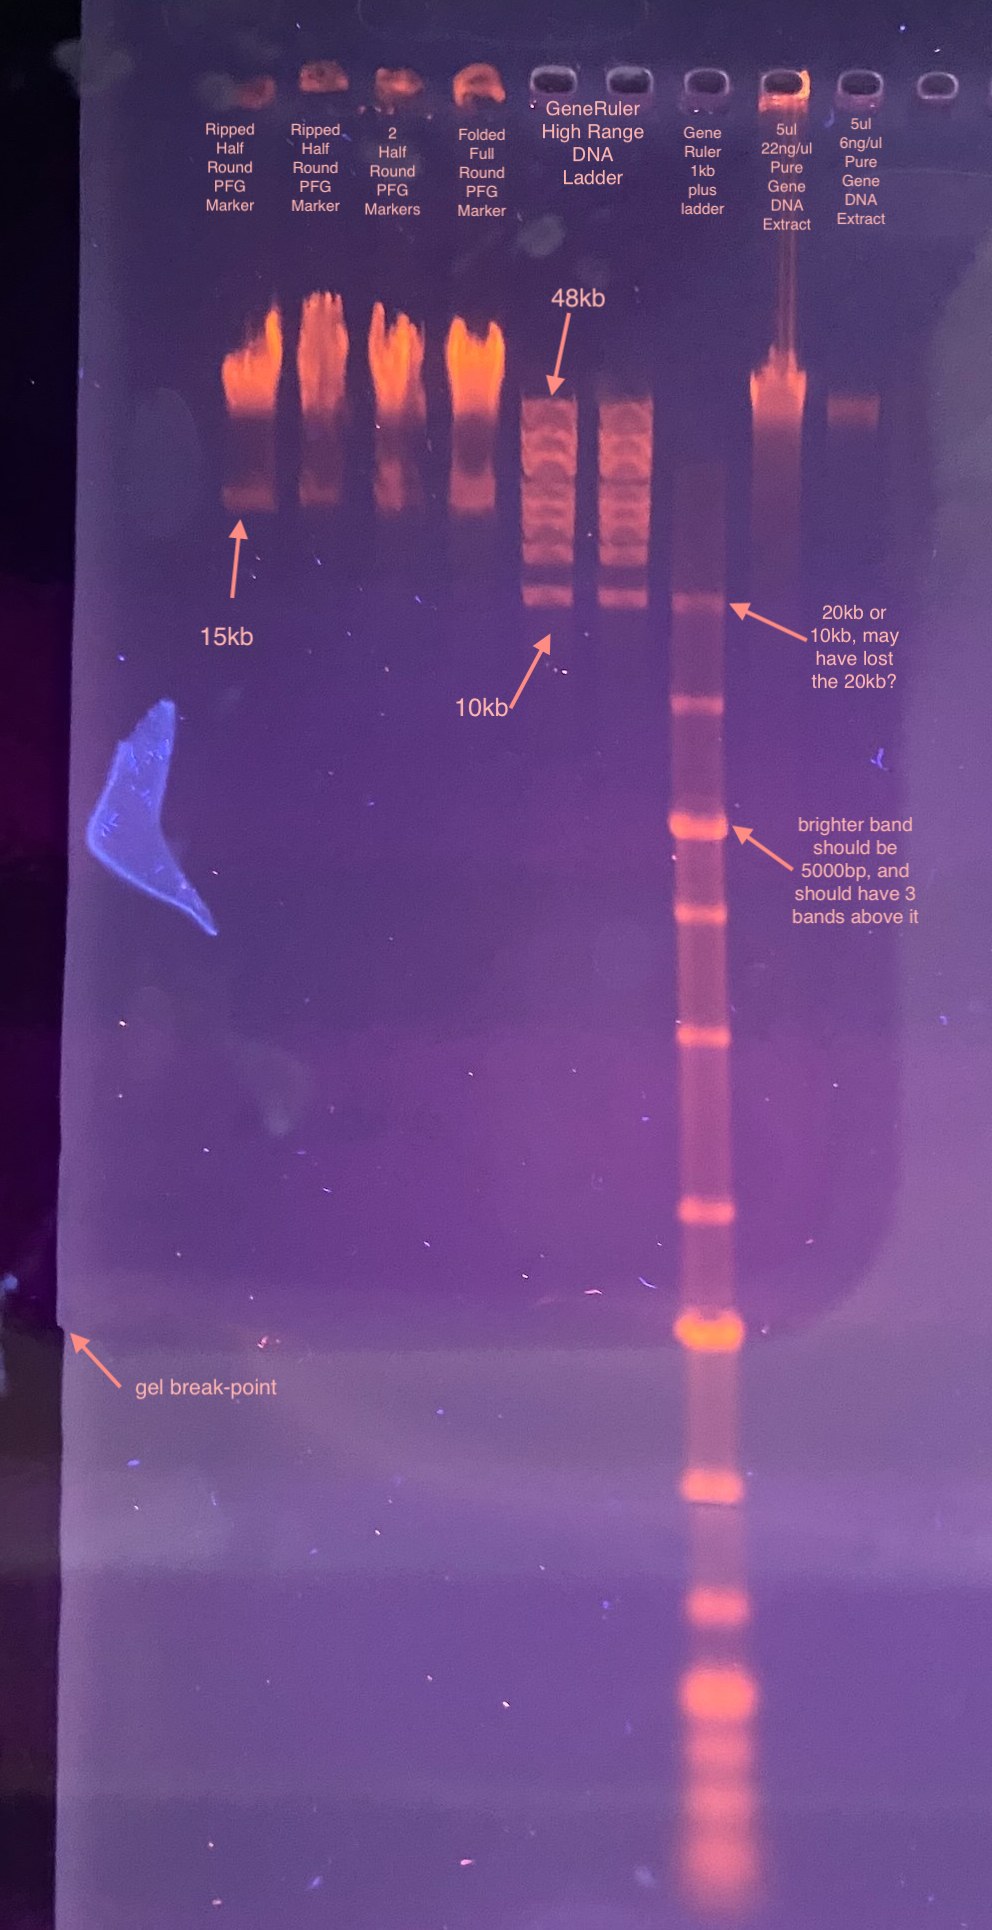
So, the gel clearly did not run long enough, although the voltage might be ok. There didn’t seem to be a difference between the ways I put in the rounds of the PFG marker, so that’s a good sign. However it migrated so little I’m not 100% sure if the sealing agarose was too hot or not. Because the lower band looks ok I’m going to assume it was ok. I can always try to measure the temp of the gel liquid before pipetting.
My plan is to try another test gel, same % and voltage, running over night for 15 and 20 hours. I’ll add ladder to both sides of the gel, then cut the gel in half at 15 hours and image half of it. I’m also going to try to use wider well combs, and more volume of the 48kb ladder (a little faint. Protocol says to use 16ul and I used 10). I probably will only try 1 round per side. Maybe 2 and have those spilt up.